BetaKey - advanced beta access system

🔑 BetaKey – Advanced Beta Access System

Only players with a key can join your server. Create keys ingame, on Discord or in the web admin panel, and let players redeem them on your own website or with the Discord bot. One plugin for Spigot/Paper, BungeeCord and Velocity.

New in BetaKey 4.0: own website with admin panel, SQLite without any database server, messages in the language of every player, commands to switch the beta system, website and Discord bot on and off, and an automatic update of your 3.x config. Updating from 3.x?

Features

🛡️ Beta access

  • Players without a redeemed key are kicked with your own message
  • Bypass list for admins and staff
  • Switch it off for a public test with /betakey disable

🔑 Key management

  • Random or custom keys
  • List all, used and unused keys
  • Ingame, in the console, on Discord and in the web admin panel

🌐 Website & admin panel

  • Redeem page directly in the plugin, no webserver needed
  • Admin panel with statistics and search
  • Themes and own languages

🤖 Discord bot

  • Players redeem keys with /redeem
  • Admins create and delete keys
  • Link Discord and Minecraft accounts, with automatic role

💾 Databases

  • SQLite: works out of the box, no setup
  • MySQL, MariaDB and PostgreSQL for networks

🌍 Languages

  • English and German included
  • auto: every player gets the language of their Minecraft client
  • Add your own language files

🔒 Security

  • Rate limits against guessing keys
  • Admin passwords salted and hashed, optional ingame confirmation
  • Regular security updates

🧩 Developer API

  • Create, delete and check keys from your own plugins
  • API guide

Supported platforms

Platform Versions Java
Spigot / Paper 1.8.8 and newer (incl. Paper 26.x) 8 or newer
BungeeCord current versions 8 or newer
Velocity 3.x 21 or newer

Minecraft 1.7 is not supported. On a BungeeCord/Velocity network, install BetaKey on the proxy.

Quick start

  1. Put the BetaKey jar for your platform into the plugins folder and start the server.
  2. BetaKey creates its files and uses SQLite, so it works right away:
    plugins/BetaKey/
      config.yml          settings (database, Discord bot, website, bypass list)
      messages/           ingame messages: en-us.yml, de-de.yml, your own languages
      database/BetaKey.db the keys (SQLite)
      website/            website settings, themes and texts
  3. Create a key: /betakey create random
  4. Let players redeem their keys, on the website (/betakey website enable) or with the Discord bot (/betakey discord enable).
  5. Players with a redeemed key can join. Everyone else gets the kick message.
Run /betakey ingame to see all commands. You can click a command in the chat to use it.

Guides

🌐 BetaKey Website

Enable the website, configure it, set up the admin panel, HTTPS and themes.

🤖 Discord bot

Create the bot, invite it to your Discord server and connect it to BetaKey.

📜 Legacy website

The PHP redeem page for a separate webserver, only if your host gives you just one port.

🧩 Developer API

Use BetaKey from your own plugins.

Commands and permissions

All /betakey commands need the permission betakey.admin (also available as /key and /betakeysystem). The console can always use them. Players use /link without a permission.

Command Description
/betakey Shows all commands (clickable in the chat)
/betakey create random Creates a random key
/betakey create custom <key> Creates your own key (at least 5 characters)
/betakey delete <key> Deletes a key
/betakey list <all|used|unused> <page> Lists the keys and who redeemed them
/betakey enable / disable Switches the beta access on or off (saved in the config.yml)
/betakey website Website commands and status, see BetaKey Website
/betakey discord enable / disable Starts or stops the Discord bot
/betakey verify <code> Confirms your login to the web admin panel
/betakey reload Loads the config, messages and website settings again
/betakey debug Shows information for the support
/link <id> Confirms the link of your Discord account (you get it as a clickable message)

Languages

The ingame messages are in plugins/BetaKey/messages. Choose the language in the config.yml:

Language: auto          # language of each player's Minecraft client, or a file name like de-de
DefaultLanguage: en-us  # used if there is no file for the client language

To add a language, copy en-us.yml (e.g. to fr-fr.yml) and translate it. A file only needs the messages you want to change, everything else is taken from en-us.yml.

Updating from BetaKey 3.x

Replace the jar and start the server. BetaKey updates everything automatically:

  • Your old config.yml is saved as config.yml.v1.backup (or the number of your old version).
  • The new config.yml keeps all your settings and gets the new comments.
  • Your messages are moved to messages/legacy-mig.yml, and the language is set to legacy-mig, so your server keeps its own texts. Set Language: auto to use the new translations instead.
  • An SQLite database of BetaKey 3.x is copied to database/BetaKey.db. MySQL databases stay as they are.

Why BetaKey?

  • 58+ customers
  • 100% satisfaction rate
  • Active development and support
"This is the best BETA KEY system plugin in the world !!!" – JackTailor

Support

Need help? Join our Discord server or ask in the forum. Please run /betakey debug and send us the output, it contains everything we need and no passwords.

How to Set Up a Discord Bot for the BetaKey Plugin

This guide will walk you through creating a Discord bot and linking it to your BetaKey System plugin.  


Step 1: Create a Discord Bot

1. Go to the Discord Developer Portal

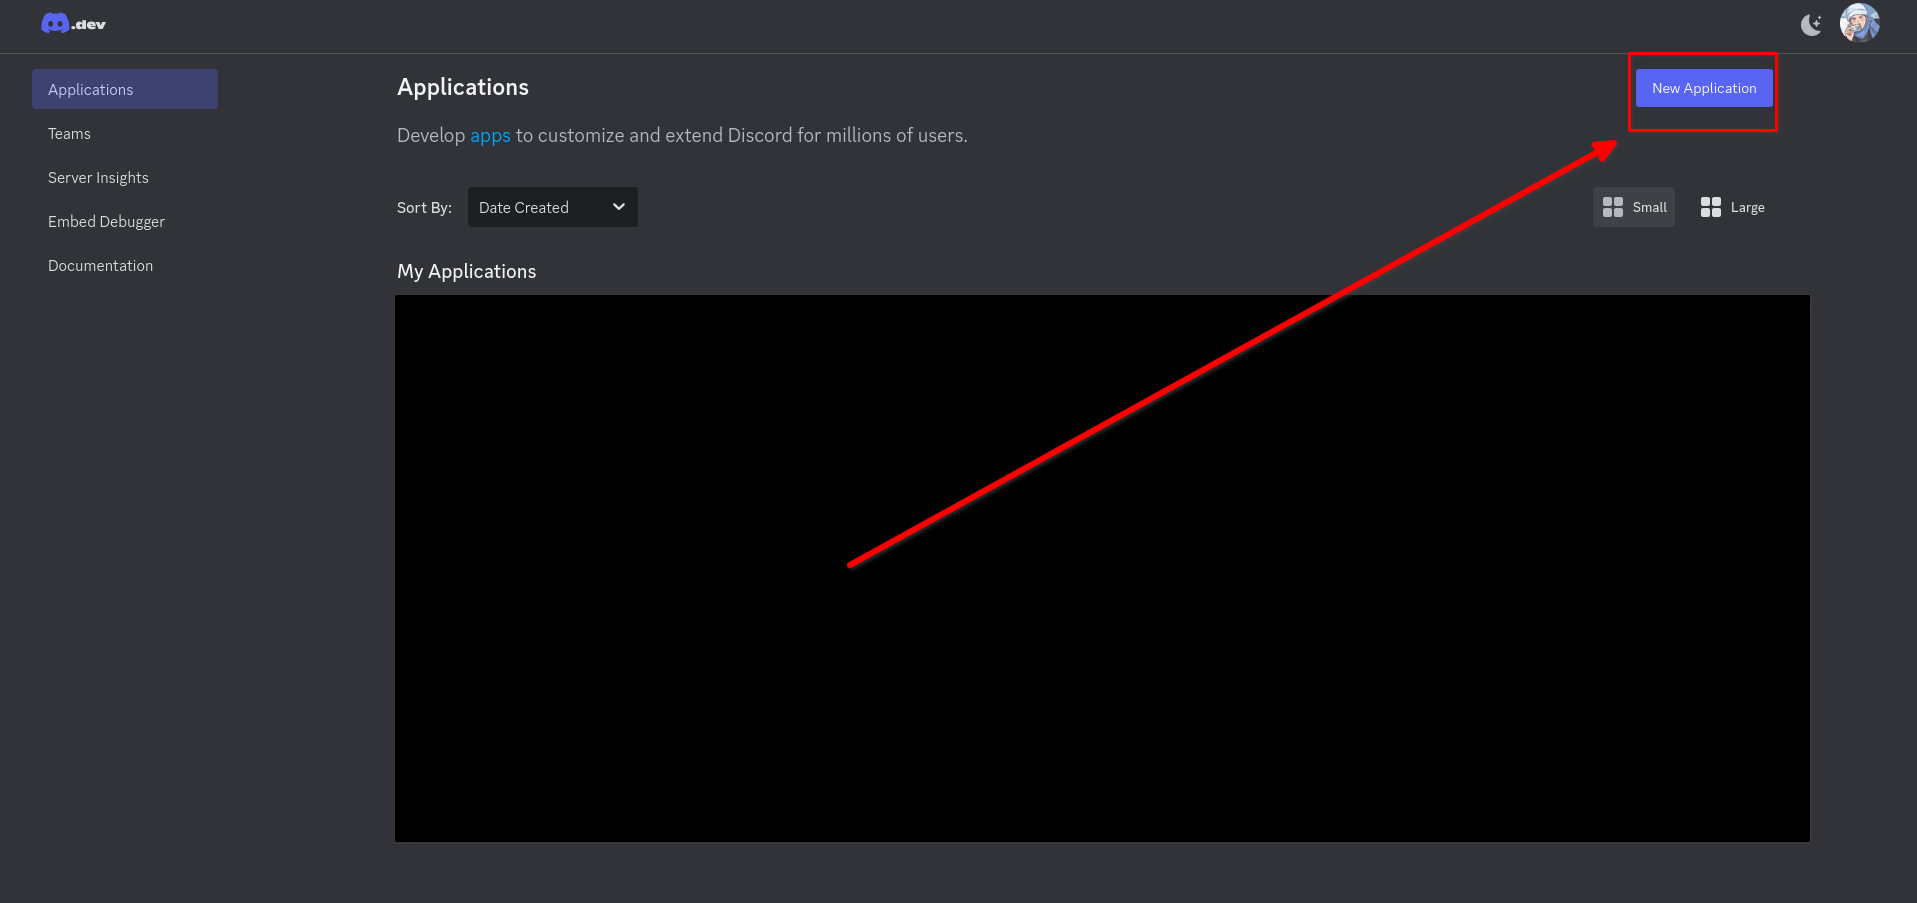
2. Create a New Application

  • Click "New Application" in the top-right corner.  
  • Enter a name (e.g., "BetaKey Bot") and click "Create".  


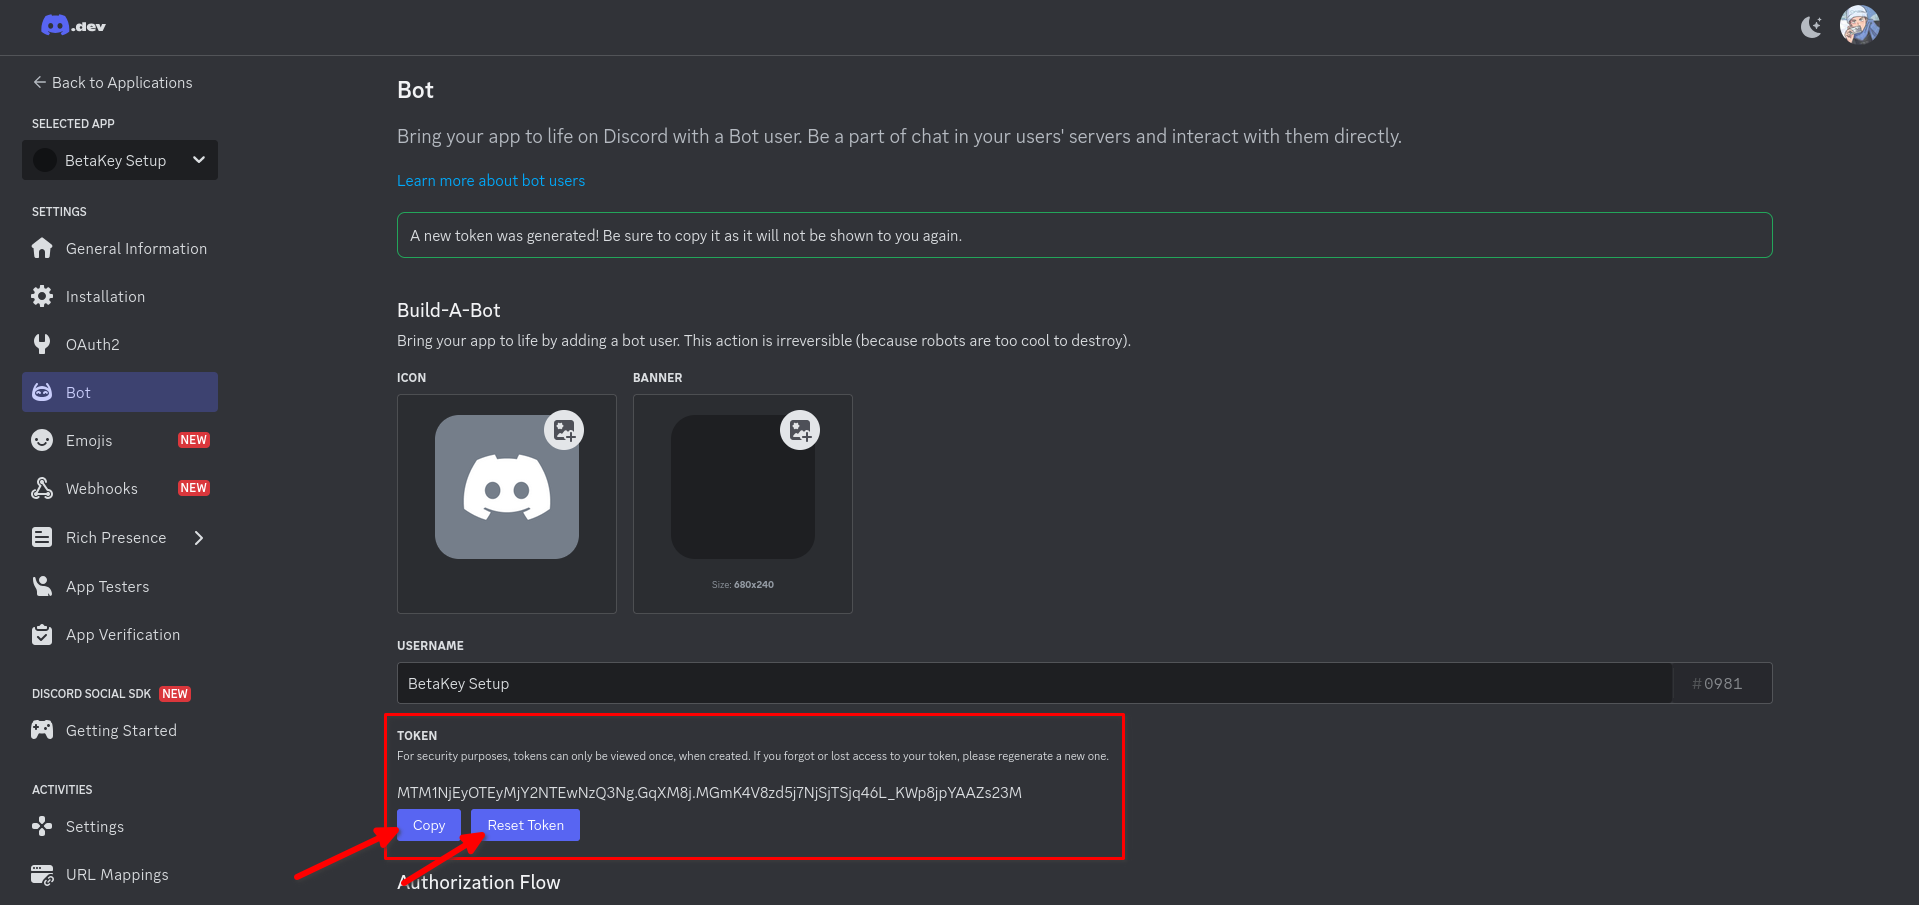
3. Copy the Bot Token

  • Under the "Bot" section, click "Reset Token".  
  • After you can "Copy" the Token and use it in the Plugin.
  • ⚠️ Keep this token private! (Never share it publicly.)  

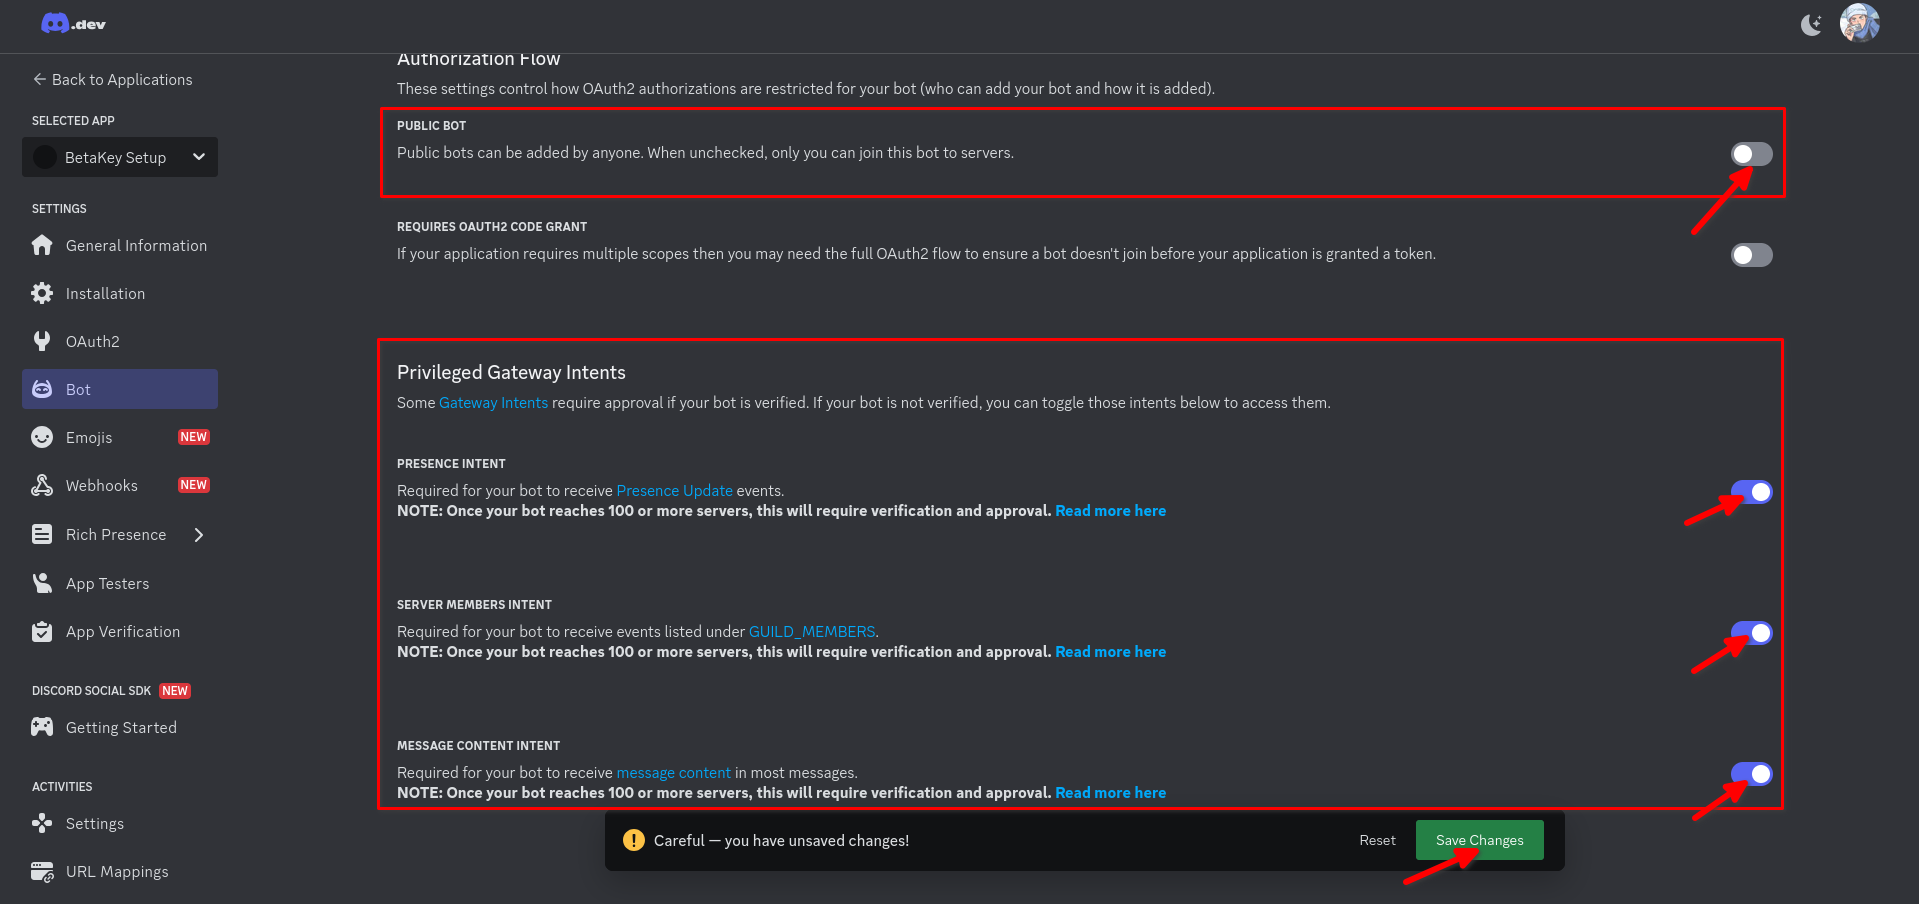
4. Enable Required Permissions

  • Scroll down to "Privileged Gateway Intents".  
  • Enable:  
    • "Presence Intent" (Optional, if needed)  
    • "Server Members Intent" (Recommended)  
    • "Message Content Intent" (Required if reading messages)  
  • You should also disable "PUBLIC BOT" so the bot only stays in your server!
    • If you get a "Private application cannot have a default authorization link." error you need to go to "Installation" and set the "Install link" as "None"


Step 2: Add the Bot to Your Discord Server

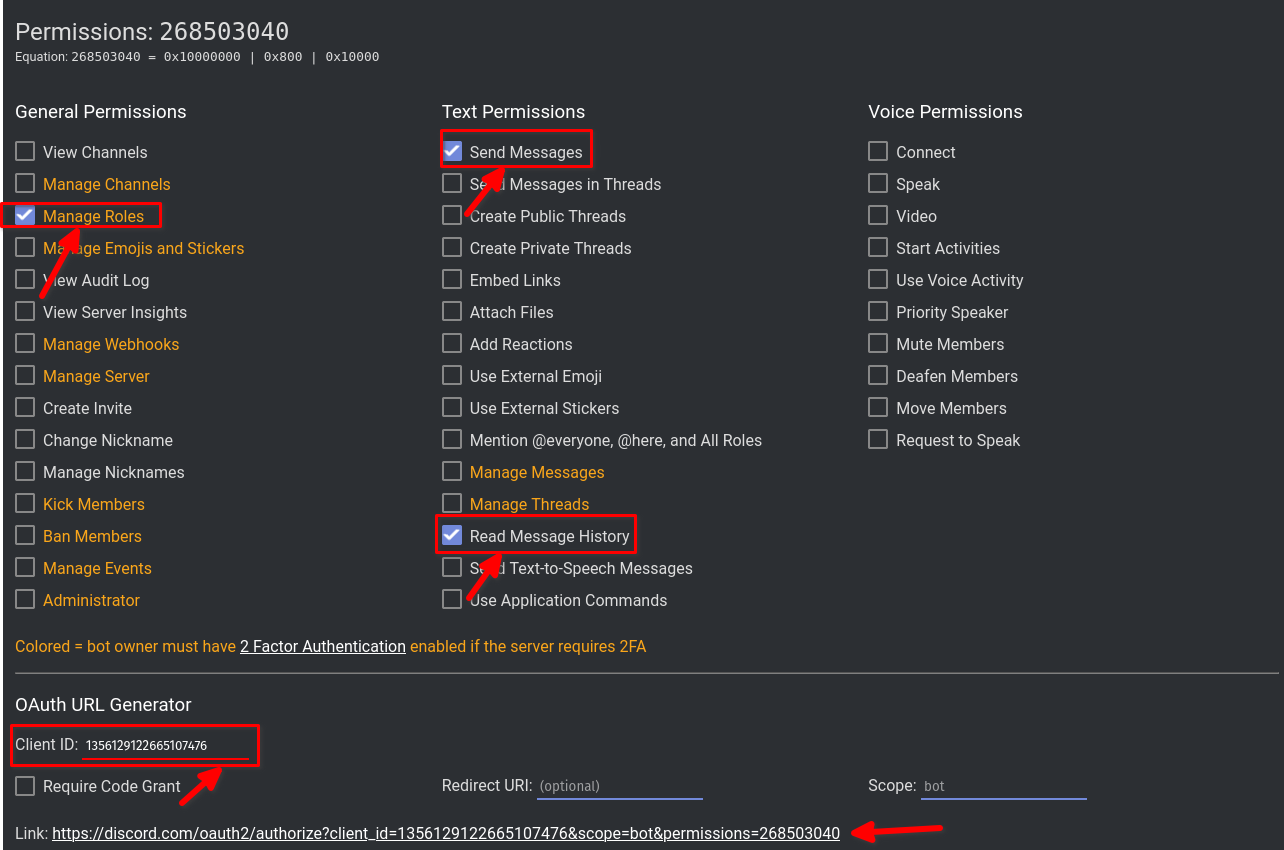
1. Go to the "Discord Permissions Calculator" Website

2. Select Bot Permissions

  • Under "Scopes", check "bot".  
  • Under "Bot Permissions", select:  
    • "Send Messages"  
    • "Read Message History" (Optional)  
    • "Manage Roles" (If needed for key verification)  

3. Insert Application/Client ID


Step 3: Get the User Role ID

This role is the role will be assigned to the user after he linked his discord account to the Minecraft account. The user needs access to the minecraft server to link their account. So this role could be a beta role, so user have access to beta specific channels.

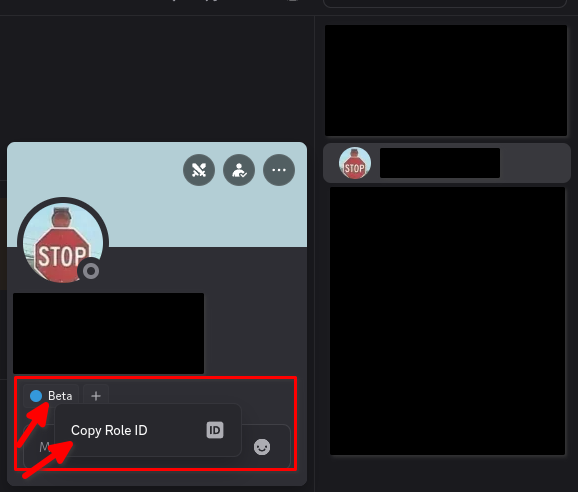
1. Enable Discord Developer Mode

  • Enable the Discord Developer Mode in your Discord Client by User Settings -> Advanced -> Developer Mode

2. Create a role and copy the ID

  • Right-click on the role and then click the "Copy Role ID" Button


Step 4: Configure the Bot in BetaKey Plugin

1. Open config.yml

  • Navigate to your server’s plugins/BetaKey/config.yml.  

2. Paste the Bot Token & Bot information

  • Find the Discord section and paste:  
    • Token: "YOUR_BOT_TOKEN"  
    • LinkRoleID: "YOUR_ROLE_ID"

Example:  

DiscordBot:
  EnableDiscordBot: true
  Token: "MTE5NDkzODQ2NzYxODc0NzYy.GA1234.abc567xyz"
OnlineStatus: ONLINE
  LinkRoleID: "946110686541520896"

Other Available online status and Activity are:

  • Status:  ONLINE |  IDLE |  DO_NOT_DISTURB |  INVISIBLE
  • Activity:  PLAYING |  LISTENING |  WATCHING

3. Restart Your Server

  • Restart your Minecraft server to apply changes.  

Step 5: Verify the Bot is Working

  • Check if the bot appears online in your Discord server.  
  • Test commands (e.g., /betakey create KEY123).  

Troubleshooting

❌ Bot not appearing?  

  • Double-check the token and permissions.  
  • Ensure the bot was invited with the correct OAuth2 link.  

❌ Commands not working?  

  • Wait a bit till Discord register Slash commands. 
  • Check if the bot has Message Content Intent enabled.  

Conclusion

Your Discord bot is now linked to the BetaKey System, allowing key management directly from Discord!  

For further help, refer to the plugin documentation or join our support server. 🚀

BetaKey Website

BetaKey 4.0 comes with its own website. It runs directly inside the plugin on your Minecraft server or proxy, so you don't need a separate webserver, PHP or an extra database. Players redeem their keys on it, and admins manage all keys in the admin panel.

This is the recommended website. Use the legacy website only if your host can't give you a second port.

Features

  • Redeem page: players enter their Minecraft name and their key. BetaKey checks the name with Mojang and stores the UUID.
  • Admin panel on /admin: statistics, who uses which key, search, creating and deleting keys.
  • Themes: change the design with your own templates and CSS, without changing the plugin.
  • Languages: English and German included, the visitor's browser language is chosen automatically.
  • Works with every database BetaKey supports: SQLite, MySQL, MariaDB and PostgreSQL.
  • Protection: rate limits against guessing keys, salted and hashed admin passwords, optional ingame confirmation of admin logins.

Requirements

  • BetaKey 4.0 or newer (Spigot/Paper 1.8.8+, BungeeCord or Velocity)
  • A free TCP port for the website, 8080 by default. Your host must let you open it (firewall / port forwarding).
Only one port available? Many Minecraft hosts only give you the game port. In that case the new website can't be reached from the internet. Use the legacy website on a separate webserver instead.

Quick start

  1. Enable the website ingame or in the console:
    /betakey website enable
    This sets Website.Enabled: true in the config.yml and starts the website right away. You can also change it in the config.yml yourself and run /betakey reload.
  2. Check that it is running:
    /betakey website
    This shows all website commands and the address, e.g. The website is running on http://<server-ip>:8080/.
  3. Open http://<your-server-ip>:8080/ in your browser. You should see the redeem page.
  4. Optional: set your server name, port and theme in plugins/BetaKey/website/settings.yml and run /betakey reload.
The website folder is created on the first start, also while the website is disabled. On Velocity the plugin folder is plugins/betakey.

The website folder

plugins/BetaKey/website/
  settings.yml        port, address, theme, language, admin panel
  lang/en.yml         texts of the website
  lang/de.yml
  themes/default/     the default theme
  themes/dark/        example theme, only overrides a few files

Missing files are restored on startup, but existing files are never overwritten. To get the newest version of a file after an update, delete it and restart the server or run /betakey reload.

settings.yml

Setting Default Description
Host 0.0.0.0 Network address the website listens on. 0.0.0.0 means all addresses. Use 127.0.0.1 if only a reverse proxy on the same machine should reach it.
Port 8080 Port of the website.
PublicUrl '' The address players use, e.g. https://beta.yourserver.net/. Shown by /betakey website. An https:// address also marks the admin login as encrypted.
ServerName Your Server Name Shown in the header of the website.
Theme default Folder name in website/themes.
DefaultLanguage en Used when the browser language has no file in website/lang.
Cache true Caches the templates. Set it to false while you work on a theme, so changes show up without a reload.
Threads 4 Threads that handle requests. The default is enough for almost every server.
TrustProxyHeaders false Only set to true behind a reverse proxy, see HTTPS.
RateLimit.RedeemAttemptsPerMinute 5 Redeem attempts per visitor IP and minute, 0 disables the limit.
AdminPanel.Enabled true Enables the admin panel on /admin.
AdminPanel.Authentication BOTH How admins log in: PASSWORD, INGAME or BOTH, see below.
AdminPanel.SessionTimeout 30 Minutes until an inactive admin is logged out.
AdminPanel.LoginAttemptsPerMinute 5 Login attempts per visitor IP (and per admin name) and minute.

Run /betakey reload after changing the settings.

Admin panel

The admin panel is available on <website>/admin, e.g. http://<server-ip>:8080/admin. It shows how many keys exist, how many are used and unused, which player uses which key, and lets you search, create (1-100 random keys or a custom key) and delete keys. Every action is logged in the server console.

Login methods

Authentication How admins log in
PASSWORD Minecraft name and password.
INGAME Minecraft name, then the admin confirms the login ingame with /betakey verify <code>.
BOTH (default, recommended) Password and ingame confirmation.

Setting up an admin

  1. Join the server with a player that has the permission betakey.admin and set your password:
    /betakey website password <password>
    The password needs 8 to 128 characters. It is stored salted and hashed in the database, and BetaKey hides this command from the server log.
  2. Open /admin on the website and log in with your Minecraft name and the password.
  3. With BOTH or INGAME the website now shows a code. Run it ingame with the same player:
    /betakey verify 123456
    Only the player who logs in can confirm the login, other admins can't. The page continues automatically.

To remove the access of an admin, run /betakey website removepassword <player>. This also logs out all sessions of that admin.

Admin sessions are kept in memory. A server restart or /betakey reload logs all admins out.

HTTPS with a reverse proxy

The website itself uses HTTP. Without HTTPS, admin passwords are sent unencrypted, and BetaKey warns about this in the console and on the login page. For a public website, put it behind a reverse proxy like nginx (with a Let's Encrypt certificate) or Cloudflare.

  1. Let the website only listen locally: Host: 127.0.0.1
  2. Set your address: PublicUrl: 'https://beta.yourserver.net/'
  3. Set TrustProxyHeaders: true, so the rate limits use the real visitor IP.
  4. Configure the proxy, for example nginx:
server {
    listen 443 ssl;
    server_name beta.yourserver.net;

    ssl_certificate     /etc/letsencrypt/live/beta.yourserver.net/fullchain.pem;
    ssl_certificate_key /etc/letsencrypt/live/beta.yourserver.net/privkey.pem;

    location / {
        proxy_pass http://127.0.0.1:8080;
        proxy_set_header Host $host;
        proxy_set_header X-Forwarded-Proto $scheme;
        # set the visitor IP yourself, so visitors can't fake it
        proxy_set_header X-Forwarded-For $remote_addr;
        proxy_set_header CF-Connecting-IP $remote_addr;
    }
}
Only enable TrustProxyHeaders if the website can only be reached through your proxy (Host: 127.0.0.1 or a firewall). Otherwise visitors could fake their IP address and bypass the rate limits.

Themes

A theme is a folder in website/themes. It only needs the files it changes, everything else is taken from its parent theme and finally from the default theme. Templates use Pebble.

themes/mytheme/
  theme.yml               Name, Author and Parent
  templates/layout.peb    page frame (blocks: title, head, header, content, footer)
  templates/redeem.peb    the redeem page
  templates/admin/        admin panel pages (login.peb, verify.peb, dashboard.peb)
  assets/                 css, images, ... available as /assets/<file>

Create your own theme

  1. Create the folder website/themes/mytheme with a theme.yml:
    Name: My Theme
    Author: You
    Parent: default
  2. Add assets/mytheme.css with your colors. The default theme uses CSS variables, so a few lines are enough:
    :root {
      --accent: #e67e22;
      --accent-hover: #d35400;
    }
  3. Add templates/layout.peb, which extends the default layout and loads your CSS:
    {% extends "default:layout.peb" %}
    
    {% block head %}
      {{ parent() }}
      <link rel="stylesheet" href="/assets/mytheme.css">
    {% endblock %}
  4. Set Theme: mytheme in the settings.yml and run /betakey reload.
  • Don't edit the default theme. Create your own theme instead, so you keep getting the newest default files.
  • {% extends "default:layout.peb" %} extends the template of a specific theme. {{ parent() }} keeps the content of the parent block.
  • Texts come from the language files: {{ t('heading') }}.
  • All template variables are listed at the top of themes/default/theme.yml.
  • Set Cache: false while you work on the theme.

Languages

The texts of the website are in website/lang, one file per language (en.yml, de.yml). The visitor's browser language is used automatically, and visitors can switch the language at the bottom of the page. To add a language, copy en.yml, e.g. to fr.yml, and translate it. Texts missing in a file are taken from the English file.

The ingame messages of BetaKey are in a separate folder, plugins/BetaKey/messages.

BungeeCord and Velocity networks

Enable the website on one BetaKey instance only, usually the proxy. If BetaKey runs on several servers, they all have to use the same MySQL, MariaDB or PostgreSQL database. SQLite only works for one server.

Commands

All commands need the permission betakey.admin. In the chat you can click a command in /betakey website to use it.

Command Description
/betakey website Shows the website commands, the status and the address.
/betakey website enable Enables the website in the config.yml and starts it.
/betakey website disable Stops the website and disables it in the config.yml.
/betakey website password <password> Sets your admin panel password (players only).
/betakey website removepassword <player> Removes the admin panel password of a player.
/betakey verify <code> Confirms your admin panel login with the code from the website.
/betakey reload Loads the config and website settings again and restarts the website.
/betakey debug Shows all information for the support, including a "Website information" section.

Troubleshooting

Problem Solution
Console: The website could not be started, port 8080 is already in use or not allowed Another program uses the port, or your host doesn't allow it. Change Port in the settings.yml and run /betakey reload.
The website runs, but can't be opened from outside Open the port in your firewall or the panel of your host. If your host only gives you one port, use the legacy website.
Console: The admin panel uses HTTP, so passwords are sent unencrypted Use HTTPS with a reverse proxy and set the PublicUrl, see HTTPS.
Console: The website theme 'x' does not exist The Theme in the settings.yml has no folder in website/themes. The default theme is used meanwhile.
The page shows 500 Internal Server Error Usually a mistake in a theme template. /betakey debug shows the last error under "Last request error".
This Minecraft account does not exist, although it does The Mojang API may be busy for a moment. Wait a minute and try again.
/betakey verify says the code is wrong The code is valid for 5 minutes and can only be confirmed by the player who logs in. Log in again on the website to get a new code.

If you need help, run /betakey debug and send the output to the support. It contains no passwords, tokens or codes.
BetaKey Legacy Website

The legacy website is the PHP redeem page of older BetaKey versions. It runs on a separate webserver and connects to the same MySQL database as the plugin. It is still available, but it gets no new features.

If possible, use the new BetaKey website instead. It runs inside the plugin, needs no webserver or PHP, works with every database and has an admin panel, themes and better protection.

When to use the legacy website

Only use the legacy website if the new website can't be used on your server, for example:

  • Your host only gives you one port (the game port), so the new website can't be reached from the internet.
  • You want the redeem page on your existing web hosting, and you can't run a reverse proxy to the Minecraft server.

If you can open a second port on your server, use the new website.

New website or legacy website?

  New website Legacy website
Runs on Inside the plugin (Minecraft server or proxy) Separate webserver with PHP
Extra port on the Minecraft server Yes (default 8080) No
Databases SQLite, MySQL, MariaDB, PostgreSQL MySQL and MariaDB only
Checks the Minecraft name with Mojang Yes, and stores the UUID No, a typo uses up the key
Admin panel Yes No
Themes and own languages Yes No (English and German only)
Protection against guessing keys Rate limit per visitor None
External services None ipinfo.io, Google Fonts, w3schools.com
Updates New features No new features

Requirements

  • A webserver with PHP 7.4 or newer and the pdo_mysql extension (most web hostings have both).
  • BetaKey configured with mysql or mariadb. SQLite and PostgreSQL don't work with the legacy website.
  • The webserver must be able to connect to the database (remote access to MySQL/MariaDB).

Setup

  1. Switch BetaKey to MySQL or MariaDB. In plugins/BetaKey/config.yml:
    MySQL:
      DatabaseManagementSystem: "mysql"
      Host: your-database-host
      Port: 3306
      Database: Betasystem
      User: betakey
      Password: YourPassword
    Restart the server (or run /betakey reload), so BetaKey connects and creates its tables. /betakey debug shows whether the database is connected.
  2. Create a database user for the website. The legacy website only reads and updates the keys, so give it only these rights and only from the address of your webserver:
    CREATE USER 'betakey_web'@'webserver-ip' IDENTIFIED BY 'a-strong-password';
    GRANT SELECT, UPDATE ON Betasystem.BetaKeys TO 'betakey_web'@'webserver-ip';
    Make sure your database (and its firewall) accepts connections from the webserver.
  3. Upload the files. Upload the content of the legacy-website folder to your webserver, for example to public_html/beta:
    index.php       sends visitors to the German or English page
    MYSQL.php       database connection
    background.png
    de/             German page
    en/             English page
  4. Enter the database connection in MYSQL.php. Use the same database as BetaKey:
    $Host = "your-database-host";
    $User = "betakey_web";
    $Database = "Betasystem";
    $Password = "a-strong-password";
    $Port = "3306";
  5. Test it. Create a key with /betakey create random, open the website and redeem it. The player can join the server right away.
The legacy website only stores the player name. BetaKey adds the UUID automatically when the player joins the server for the first time.

Security and privacy

  • Use HTTPS for the website (most web hostings offer free Let's Encrypt certificates).
  • No rate limit: the legacy website doesn't limit redeem attempts. Use long random keys (/betakey create random), so they can't be guessed.
  • Privacy: index.php sends the IP address of every visitor to ipinfo.io to choose the language, and the pages load fonts and CSS from Google and w3schools.com. Mention this in your privacy policy, or use the new website, which loads nothing from other services.
  • If the database connection fails, MYSQL.php shows the database error on the page. Check the connection right after the setup.

Troubleshooting

Problem Solution
The page shows SQL Error: ... The webserver can't connect to the database. Check the values in MYSQL.php, the database user rights and whether remote access is allowed.
This key does not exist!, although it exists ingame The website and BetaKey use different databases. Compare MYSQL.php with the MySQL section of the config.yml. With SQLite, BetaKey stores the keys in a local file that the website can't reach: switch to MySQL or MariaDB.
The player redeemed a key, but still can't join Check that the name was entered correctly. The legacy website doesn't check the name, a typo redeems the key for a different name. Delete the key with /betakey delete <key> and create a new one.

How to Use the BetaKey System API

The BetaKey System provides a simple API to manage beta keys for your Minecraft server. With this API, you can create, delete, and check the existence of beta keys programmatically.

Setting Up the API

Before using the API, you need to import the BetaKeyVersion-X.X-RELEASE.jar file into your Java project.

Steps to Import the Plugin

  1. Download the BetaKey System from BuiltByBit.
  2. Add it to your project's build path (e.g., in Eclipse: Right-click project → Build Path → Add External Archives).
  3. Ensure your project has the necessary dependencies (e.g., Spigot/Bukkit if required).

API Methods

Once the plugin is imported, you can use the following methods:

1. Creating a Beta Key

BetaKeyAPI.createKey("key");
  • Description: Generates a new beta key and stores it in the system.
  • Parameters:
    • key (String) – The key you want to create.
  • Returns: void

Example:

BetaKeyAPI.createKey("MCBETA2024");

2. Deleting a Beta Key

BetaKeyAPI.deleteKey("key");
  • Description: Removes an existing beta key from the system.
  • Parameters:
    • key (String) – The key you want to delete.
  • Returns: void

Example:

BetaKeyAPI.deleteKey("MCBETA2024");

3. Checking if a Key Exists

boolean exists = BetaKeyAPI.keyAlreadyExists("key");
  • Description: Checks whether a given beta key already exists in the system.
  • Parameters:
    • key (String) – The key you want to verify.
  • Returns: boolean (true if the key exists, false otherwise)

Example:

if (BetaKeyAPI.keyAlreadyExists("MCBETA2024")) {  
    System.out.println("Key already exists!");  
} else {  
    System.out.println("Key is available.");  
}

Error Handling

  • If the API methods are called without the plugin being loaded, they may throw an exception.
  • Always ensure the BetaKey plugin is running on your server before making API calls.

Conclusion

The BetaKey API provides an easy way to manage beta keys dynamically. Whether you need to generate keys for promotions, validate existing ones, or remove unused keys, this API simplifies the process.

For further assistance, refer to the plugin documentation or contact support.

Happy coding! 🚀