BetaKey - advanced beta access system
🔑 BetaKey – Advanced Access System
Secure Beta Key Management for Your Community
✔️ Discord Integration
- Redeem in Discord
- Automatic Role Assignment ✅
✔️ Admin Control
- Full MySQL Support 📊
- Ingame key control
- Discord key control
💻 Download & Setup
- 📥 [Download Now]
- 📚 [Setup Guide]
⭐ Why Choose BetaKey?
- 58+ Customers
- 100% Satisfaction Rate
- " This is the best BETA KEY system plugin in the world !!!" – JackTailor
📞 Support
- Discord Server: Join Now
🔒 Security Guarantee
- Regular Security Patches 🔐
👉 BUY NOW
How to Use the BetaKey System API
The BetaKey System provides a simple API to manage beta keys for your Minecraft server. With this API, you can create, delete, and check the existence of beta keys programmatically.
Setting Up the API
Before using the API, you need to import the BetaKeyVersion-X.X-RELEASE.jar file into your Java project.
Steps to Import the Plugin
- Download the BetaKey System from BuiltByBit.
- Add it to your project's build path (e.g., in Eclipse: Right-click project → Build Path → Add External Archives).
- Ensure your project has the necessary dependencies (e.g., Spigot/Bukkit if required).
API Methods
Once the plugin is imported, you can use the following methods:
1. Creating a Beta Key
BetaKeyAPI.createKey("key");
- Description: Generates a new beta key and stores it in the system.
- Parameters:
key(String) – The key you want to create.
- Returns:
void
Example:
BetaKeyAPI.createKey("MCBETA2024");
2. Deleting a Beta Key
BetaKeyAPI.deleteKey("key");
- Description: Removes an existing beta key from the system.
- Parameters:
key(String) – The key you want to delete.
- Returns:
void
Example:
BetaKeyAPI.deleteKey("MCBETA2024");
3. Checking if a Key Exists
boolean exists = BetaKeyAPI.keyAlreadyExists("key");
- Description: Checks whether a given beta key already exists in the system.
- Parameters:
key(String) – The key you want to verify.
- Returns:
boolean(trueif the key exists,falseotherwise)
Example:
if (BetaKeyAPI.keyAlreadyExists("MCBETA2024")) {
    System.out.println("Key already exists!");
} else {
    System.out.println("Key is available.");
}
Error Handling
- If the API methods are called without the plugin being loaded, they may throw an exception.
- Always ensure the BetaKey plugin is running on your server before making API calls.
Conclusion
The BetaKey API provides an easy way to manage beta keys dynamically. Whether you need to generate keys for promotions, validate existing ones, or remove unused keys, this API simplifies the process.
For further assistance, refer to the plugin documentation or contact support.
Happy coding! 🚀
How to Set Up a Discord Bot for the BetaKey Plugin
This guide will walk you through creating a Discord bot and linking it to your BetaKey System plugin.
Step 1: Create a Discord Bot
1. Go to the Discord Developer Portal
- Open Discord Developer Portal.
- Log in if necessary.
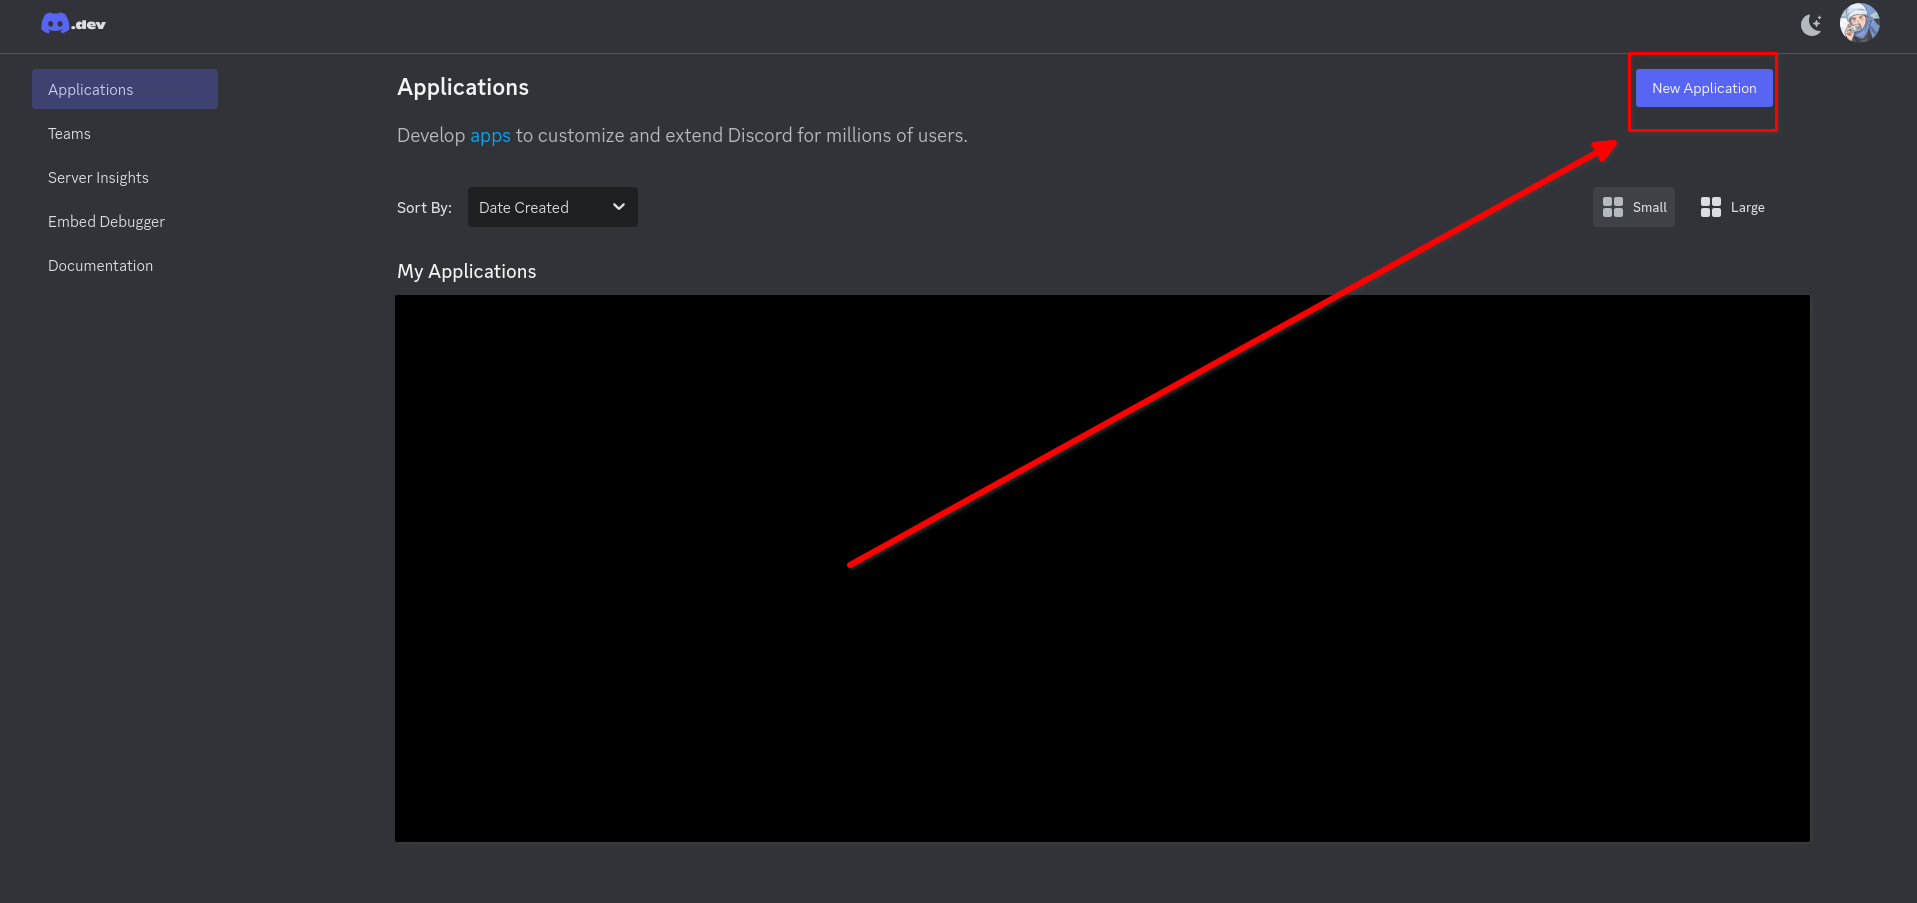
2. Create a New Application
- Click "New Application" in the top-right corner.
- Enter a name (e.g., "BetaKey Bot") and click "Create".
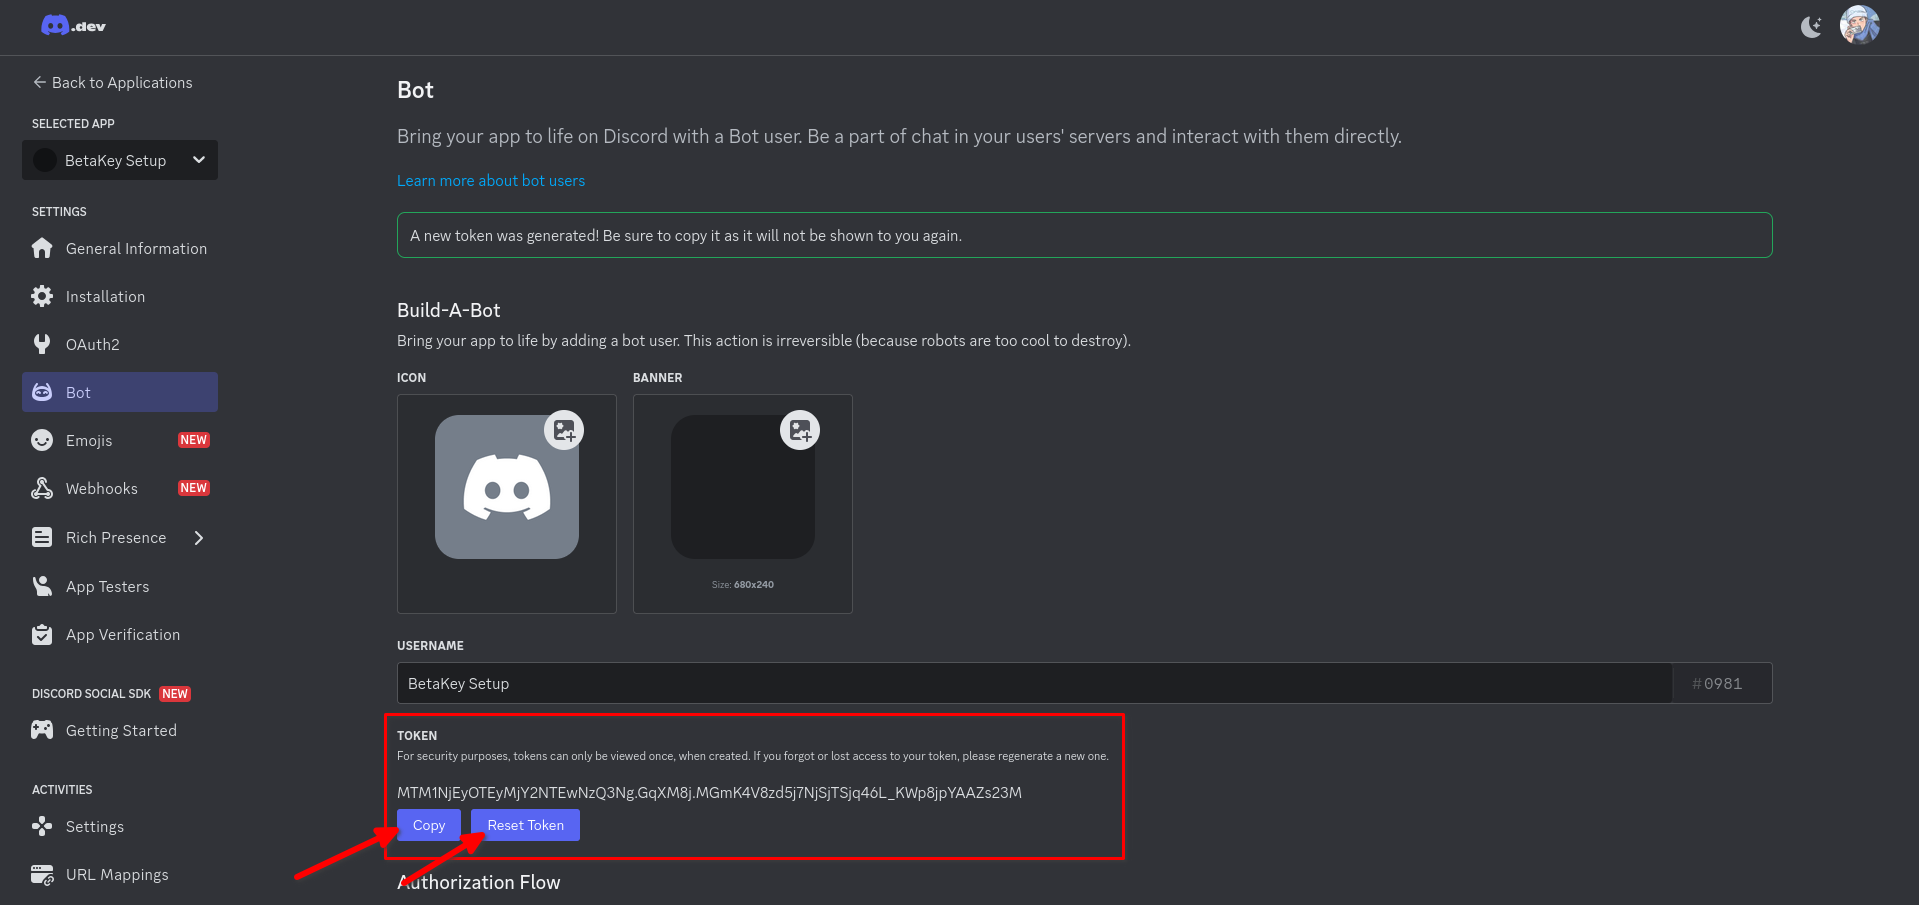
3. Copy the Bot Token
- Under the "Bot" section, click "Reset Token".
- After you can "Copy" the Token and use it in the Plugin.
- ⚠️ Keep this token private! (Never share it publicly.)
4. Enable Required Permissions
- Scroll down to "Privileged Gateway Intents".
- Enable:
- "Presence Intent" (Optional, if needed)
- "Server Members Intent" (Recommended)
- "Message Content Intent" (Required if reading messages)
- You should also disable "PUBLIC BOT" so the bot only stays in your server!
- If you get a "Private application cannot have a default authorization link." error you need to go to "Installation" and set the "Install link" as "None"

Step 2: Add the Bot to Your Discord Server
1. Go to the "Discord Permissions Calculator" Website
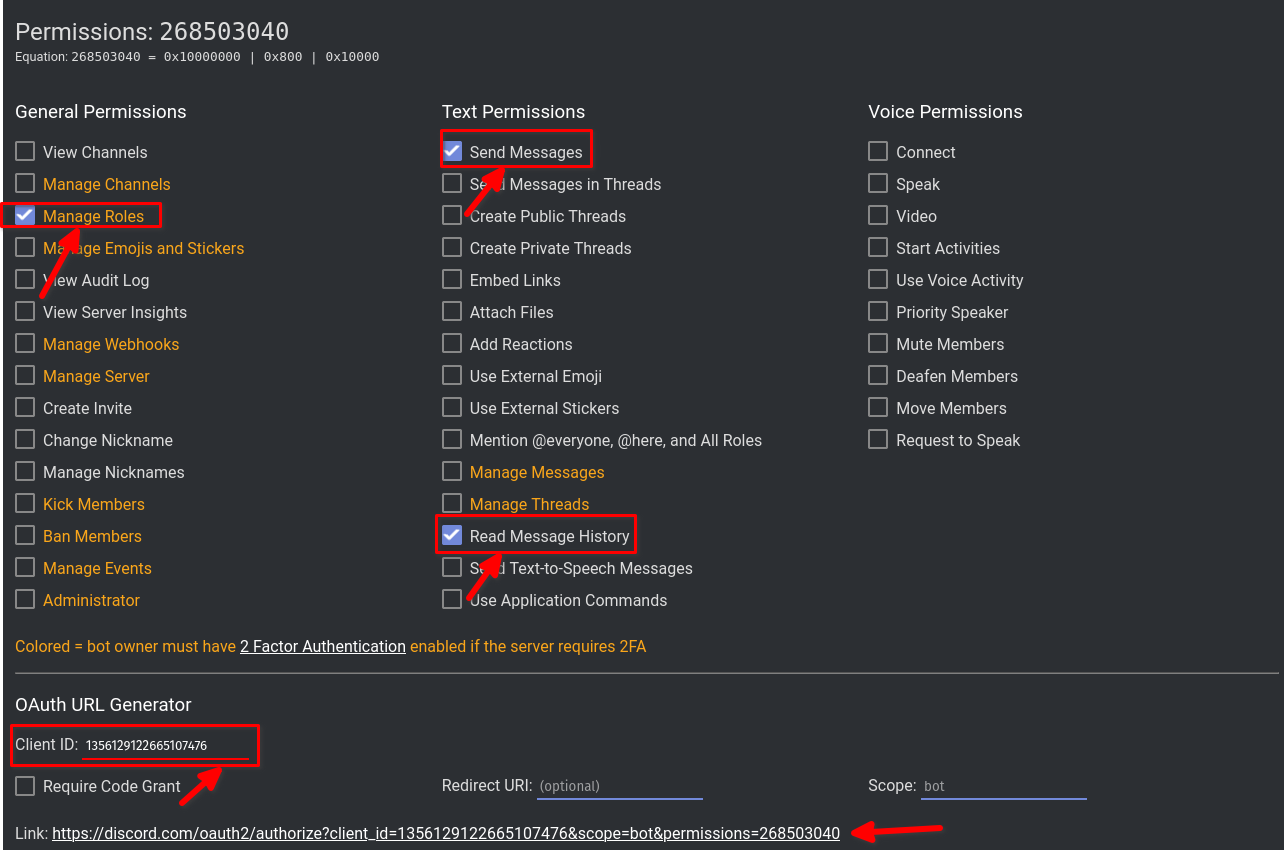
2. Select Bot Permissions
- Under "Scopes", check "bot".
- Under "Bot Permissions", select:
- "Send Messages"
- "Read Message History" (Optional)
- "Manage Roles" (If needed for key verification)
3. Insert Application/Client ID
Step 3: Get the User Role ID
This role is the role will be assigned to the user after he linked his discord account to the Minecraft account. The user needs access to the minecraft server to link their account. So this role could be a beta role, so user have access to beta specific channels.
1. Enable Discord Developer Mode
- Enable the Discord Developer Mode in your Discord Client by
User Settings->Advanced->Developer Mode
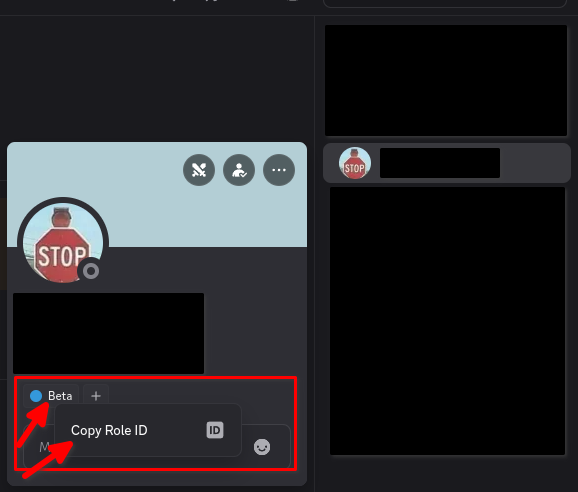
2. Create a role and copy the ID
- Right-click on the role and then click the "
Copy Role ID" Button
Step 4: Configure the Bot in BetaKey Plugin
1. Open config.yml
- Navigate to your server’s
plugins/BetaKey/config.yml.
2. Paste the Bot Token & Bot information
- Find the Discord section and paste:
Token: "YOUR_BOT_TOKEN"LinkRoleID: "YOUR_ROLE_ID"
Example:
DiscordBot:
  EnableDiscordBot: true
  Token: "MTE5NDkzODQ2NzYxODc0NzYy.GA1234.abc567xyz"
  OnlineStatus: ONLINE
  LinkRoleID: "946110686541520896"
Other Available online status and Activity are:
- Status: ONLINE | IDLE | DO_NOT_DISTURB | INVISIBLE
- Activity: PLAYING | LISTENING | WATCHING
3. Restart Your Server
- Restart your Minecraft server to apply changes.
Step 5: Verify the Bot is Working
- Check if the bot appears online in your Discord server.
- Test commands (e.g.,
/betakey create KEY123).
Troubleshooting
❌ Bot not appearing?
- Double-check the token and permissions.
- Ensure the bot was invited with the correct OAuth2 link.
❌ Commands not working?
- Wait a bit till Discord register Slash commands.
- Check if the bot has Message Content Intent enabled.
Conclusion
Your Discord bot is now linked to the BetaKey System, allowing key management directly from Discord!
For further help, refer to the plugin documentation or join our support server. 🚀